Last updated: August 29, 2026
Most ergonomic issues aren’t caused by having the wrong equipment — they’re caused by having equipment in the wrong position. The fixes that make the biggest difference are usually free: adjusting your chair height, moving your monitor, or clearing the cables from under your desk.
This guide walks you through each zone of your workspace — chair, desk, monitor, keyboard and mouse, lighting, and standing setup — with a simple yes/no checklist. For every “no,” you’ll find what it means and how to fix it, starting with zero-cost adjustments before suggesting budget-friendly upgrades. If you’re setting up from scratch, our guide to building a home office on a budget shows where to allocate your first $200.
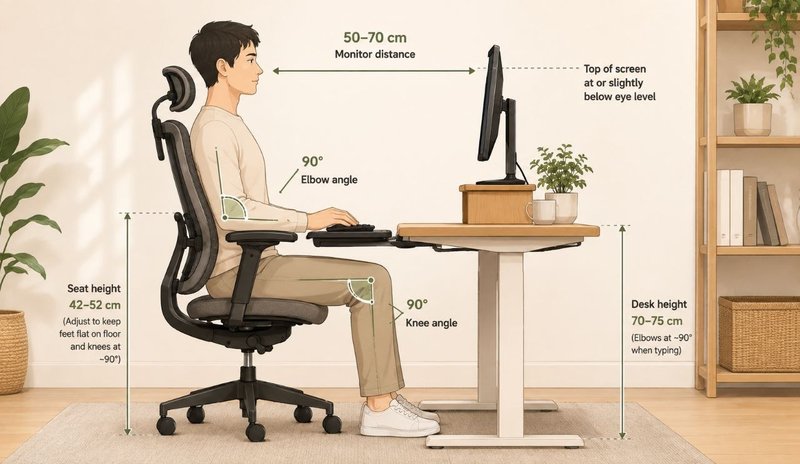
Chair Audit: Is Your Seat Working for You?
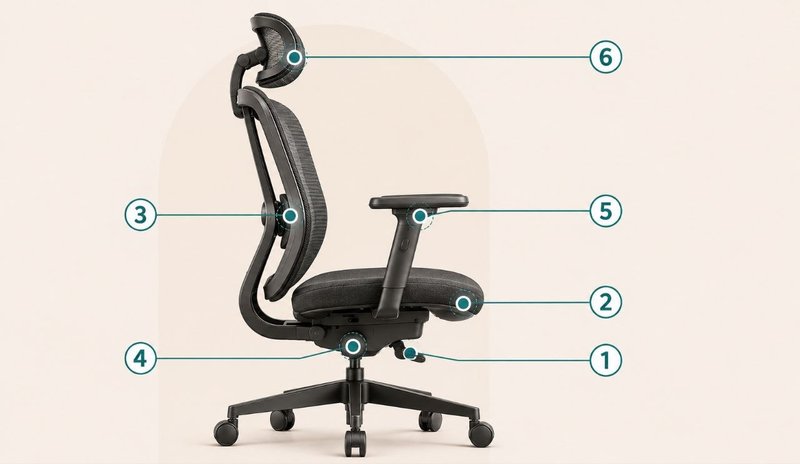
Chair Checklist
- ☐ Can you sit with your feet flat on the floor and knees at roughly 90°?
- ☐ Is there a 2–3 finger gap between the front edge of the seat and the back of your knees?
- ☐ Does the backrest support you at a slight recline (roughly 100–110°) without you straining to see the screen?
- ☐ Does the lumbar support hit at belt level, following the natural curve of your lower back?
- ☐ Can you rest your elbows at roughly 90° without shrugging your shoulders?
- ☐ Do your armrests let your arms rest naturally at your sides — not too wide, not too narrow?
What a “No” Means — and How to Fix It
Feet not flat / knees not at ~90°: Your chair height needs adjusting. If the chair is already at its lowest, raise your feet with a sturdy box or an under-desk footrest. If the chair won’t go low enough, a higher desk or keyboard tray may be needed.
No gap behind knees: The seat is too deep for you. A small lumbar cushion or rolled towel behind your lower back can effectively reduce the usable seat depth. If the seat feels too shallow, try adding a seat cushion.
Backrest too upright or too reclined: A backrest angle of roughly 100–110° (slightly past vertical) is a practical starting point. Too upright puts constant muscle tension on your back; too far back makes you crane forward to see the screen. Adjust the tilt tension so the chair reclines smoothly without effort.
Lumbar support in the wrong spot: The support should land at belt level, following your lower back’s natural curve. If your chair lacks adjustable lumbar support, add an ergonomic lumbar cushion or a rolled towel. The support should feel gentle — it’s there to fill a gap, not push hard.
Armrests at the wrong height or width: If armrests are too high, you’ll shrug — contributing to neck and shoulder discomfort. Too low and you’ll lean to one side. Armrests should support your elbows at ~90° without lifting your shoulders. Width should let your arms fall naturally at your sides. Remember: armrests are for occasional rest between typing, not constant weight-bearing.
Budget upgrade: If your current chair lacks the adjustments you need, browse our Ergonomic Office Chair or the full Chairs collection.
Desk Audit: Height, Depth, and Leg Room
Desk Checklist
- ☐ Are your elbows at roughly 90° when your hands rest on the keyboard?
- ☐ Is your desk deep enough to position your monitor at a comfortable viewing distance without crowding your keyboard?
- ☐ Is the space under your desk completely clear — no storage units, crossbars, or cable bundles in the way of your legs?
- ☐ Can you move your legs freely side to side and forward?
What a “No” Means — and How to Fix It
Elbows not at ~90°: Your desk height and chair height are mismatched. Most standard desks sit around 28–30 inches — that’s a rough reference, not a universal rule. Adjust your chair height first (get feet flat, knees ~90°), then check elbow position. If your desk is too high, raise your chair and add a footrest. If it’s too low, desk risers or a standing desk converter can bridge the gap.
Desk too shallow for monitor distance: Your monitor should sit roughly 50–70 cm from your eyes (about an arm’s length). If your desk isn’t deep enough, try a monitor arm to push the screen back, or re-evaluate what lives on your desk surface — note holders, phone stands, and other accessories can steal precious depth.
Leg room blocked: Remove storage units, boxes, or anything stored under the desk that limits leg movement. Route cables along the back edge or underside — a silicone cable holder keeps them tidy and out of your way. If a crossbar hits your knees, you may need a different desk frame or to adjust your sitting position.
Monitor Audit: Position, Distance, and Brightness
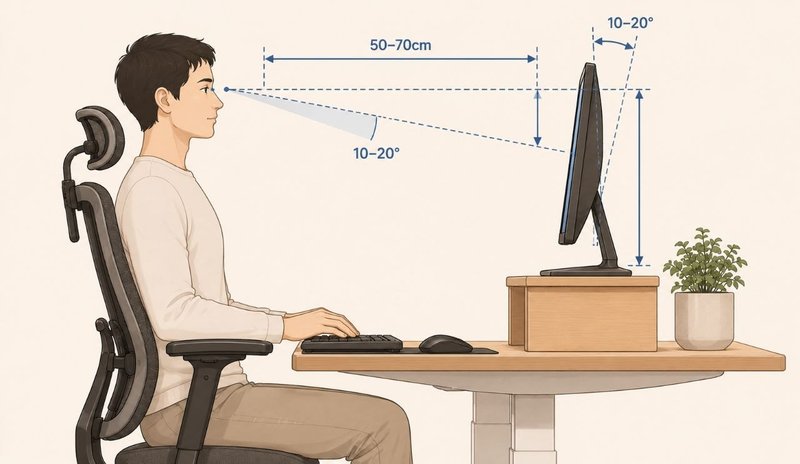
Monitor Checklist
- ☐ Is the top of your screen at or slightly below eye level?
- ☐ Is your monitor roughly an arm’s length away (about 50–70 cm from your eyes)?
- ☐ Is your primary screen centered directly in front of you — not off to the side?
- ☐ Does your screen brightness roughly match the room lighting around you?
What a “No” Means — and How to Fix It
Screen too high or too low: The top edge of your monitor should sit at or slightly below eye level so your gaze angles down 10–20°. A screen that’s too high can encourage you to tilt your head back; too low and you’ll hunch forward. Use books, a monitor riser, or a monitor arm for easy height adjustment. If you work on a laptop, a laptop stand ($84) or the Adjustable Aluminum Laptop Stand ($34) raises the screen to eye level — see our laptop stand buyer’s guide for help choosing.
Monitor too close or too far: A practical test: extend your arm — your fingertips should just touch or nearly touch the screen. If you find yourself leaning forward to read text, move the screen closer or increase the text size in your display settings. Standard distance is roughly 50–70 cm, but larger screens may need more distance.
Screen off-center: For a single monitor, center it directly in front of your chair. For dual monitors, center the pair so you don’t have a dominant twist to one side, or position your primary monitor directly in front and the secondary off to the side at the same height and distance. Avoid any setup that requires twisting your neck to see your main working area.
Brightness mismatch: Your screen should blend with the room — not be the brightest or dimmest object in your field of view. Enable automatic brightness if your monitor supports it, or manually adjust. In a dim room, lowering brightness can reduce visual fatigue; in a bright room, a screen that’s too dim forces squinting.
Keyboard & Mouse Audit: Wrist Position and Reach
Keyboard & Mouse Checklist
- ☐ Are your wrists straight (neutral, not bent upward or downward) while you type?
- ☐ Is your mouse directly next to your keyboard — at the same height — so you don’t need to reach?
- ☐ Is your keyboard flat or at a slight negative tilt (the spacebar edge slightly higher than the top row)?
- ☐ When you use the mouse, do you move from the elbow rather than flicking your wrist?
What a “No” Means — and How to Fix It
Wrists not straight: If your wrists bend upward while typing, your keyboard is likely too low or has a steep positive tilt (the top row higher than the spacebar). Keep the keyboard flat or use a slight negative tilt — the spacebar edge slightly higher than the function row. If your desk height forces an awkward wrist angle, a keyboard tray can help.
Reaching for the mouse: Your mouse should sit right next to your keyboard at the same height. A wide reach forces your shoulder outward and can contribute to shoulder and upper-back discomfort over a long day. If desk width is limited, consider a compact keyboard (tenkeyless) to bring the mouse closer.
Wrist/palm supports: A wrist rest can be useful for brief pauses between typing, but you shouldn’t press against it while actively typing — that can compress the underside of the wrist. The goal is neutral posture: hands floating freely above the keyboard, with the rest available for micro-breaks.
Lighting Audit: Glare, Task Light, and Eye Breaks
Lighting Checklist
- ☐ Is your screen free of glare or reflections from windows and room lights?
- ☐ Does your task light illuminate your work surface — not your screen?
- ☐ Do you take regular eye breaks, such as the 20-20-20 rule (every 20 minutes, look at something ~20 feet away for 20 seconds)?
What a “No” Means — and How to Fix It
Glare or reflections on screen: Close blinds or curtains if windows are the source. Reposition the monitor so reflections from overhead lights or windows don’t hit the screen at your viewing angle. An anti-glare screen protector can help if repositioning isn’t possible. Adjust room lighting to reduce harsh contrast between the screen and the wall behind it.
Task light pointing wrong: Your desk lamp should light your documents or work surface, not shine directly onto the screen. An adjustable arm lets you direct light precisely. An LED desk lamp with adjustable color temperature can match your room’s lighting for a more comfortable setup throughout the day.
Skipping eye breaks: The 20-20-20 rule is a simple habit commonly recommended to help reduce visual fatigue during prolonged screen use: every 20 minutes, look at something roughly 20 feet away for 20 seconds. Set a timer on your phone or computer until it becomes automatic.
Standing Desk Audit: Height, Mats, and Footwear
Standing Checklist
- ☐ When standing, are your elbows at roughly 90° with your shoulders relaxed and hands on the keyboard?
- ☐ Do you use an anti-fatigue mat — especially on hard floors?
- ☐ Are you wearing supportive shoes rather than standing in socks or bare feet?
What a “No” Means — and How to Fix It
Standing height off: Adjust the desk until your elbows are at ~90° when your hands rest on the keyboard, with shoulders relaxed and not lifted. The exact height varies by body proportions — there’s no single number. If you don’t have a height-adjustable desk, a 32-inch standing desk converter adds sit-stand flexibility to a fixed-height desk.
No anti-fatigue mat: An anti-fatigue mat provides cushioning and encourages the micro-movements that can reduce leg fatigue during prolonged standing. This matters most on hard surfaces like tile or hardwood. Budget mats work fine for occasional standing; if you stand for hours daily, a thicker mat is worth the investment.
Wrong footwear: Standing in socks or bare feet on a hard floor can contribute to foot and leg discomfort over time. Wear supportive shoes, or use a small footrest to shift weight between feet periodically.
What to Fix First — and When to Buy
Most ergonomic fixes cost nothing. Before buying anything, work through the fixes in this order:
- Fix your chair position: adjust seat height so feet are flat and knees near 90 degrees, set lumbar support to the curve of your lower back, and position armrests so your shoulders stay relaxed. Many chair problems are adjustment problems, not chair-quality problems.
- Fix your monitor position: raise or lower the screen so the top sits near eye level, about an arm length away. Free fix: use books, a box, or a ream of paper. Low-cost fix: a monitor riser or stand.
- Fix your keyboard and mouse position: bring them close enough that you do not reach forward, and keep wrists straight. If your current keyboard forces your wrists to bend up, a small lift or tilt can help before you consider replacing it.
- Fix your lighting: move a lamp so it lights your work without glaring on the screen. Free fix: reposition what you have. Low-cost fix: a desk lamp.
- Fix standing posture: if you use a standing desk, set the height so your elbows are near 90 degrees and your wrists are straight, and shift positions regularly rather than locking into one.
When do you actually buy something? Buy a product when the free fix isn’t enough — for example, when your chair genuinely lacks the adjustment you need, when your monitor needs a real height range rather than books, or when your desk is too high for your legs and a footrest is the practical answer. Products such as ergonomic chairs and monitor arms solve specific gaps; see the zone audit sections above for which product solves which problem.
Quick Setup Checklist: The One-Page Summary
Use this printable-style summary as a daily reference or a quick spot-check. Tick each item after confirming it’s in place.
Chair
- [ ] Feet flat on floor, knees ~90°
- [ ] 2–3 finger gap behind knees
- [ ] Backrest at slight recline (~100–110°)
- [ ] Lumbar support at belt level
- [ ] Elbows ~90°, shoulders relaxed
- [ ] Armrests at natural width, not used for constant support
Desk
- [ ] Elbows ~90° when hands on keyboard
- [ ] Enough depth for comfortable monitor distance
- [ ] Clear leg room — no boxes, crossbars, or cables
- [ ] Cables managed away from leg space
Monitor
- [ ] Top of screen at or slightly below eye level
- [ ] Roughly arm’s length away (50–70 cm)
- [ ] Centered directly in front of you
- [ ] Brightness matches room lighting
Keyboard & Mouse
- [ ] Wrists straight while typing
- [ ] Mouse next to keyboard, same height
- [ ] Keyboard flat or slight negative tilt
- [ ] Move mouse from elbow, not wrist
Lighting
- [ ] No glare or reflections on screen
- [ ] Task light on work surface, not screen
- [ ] 20-20-20 eye breaks every 20 minutes
Standing
- [ ] Elbows ~90°, shoulders relaxed
- [ ] Anti-fatigue mat on hard floors
- [ ] Supportive footwear (no socks on hard floors)
This guide provides general ergonomic advice, not medical treatment. Measurements are practical starting points — individual needs vary.
This guide is part of Hemi Life’s Home Office Setup series. We help remote workers create practical, comfortable, and affordable workspaces.
Ready to Upgrade Your Workspace?
For targeted lumbar support, see our Office Ergonomic Lumbar Cushion. Ready for a full chair upgrade? Browse our Ergonomic Office Chair — or explore the full Ergonomics collection in the Hemi Store.
Related Guides
This setup audit is the hub. Each zone below links to a deeper, focused guide that goes further than the checklist can:
- Building a home office on a budget — where to spend your first $200 when you are starting from scratch.
- Ergonomic chair vs regular chair — the before-you-buy caution ledger for chairs, including hidden costs and fit traps.
- Monitor arm vs riser vs stand — decision-led with measurement, starting from your screen height.
- Ergonomic mouse vs regular mouse — separating the myths from the real trade-offs in hand position and precision.
- Ergonomic keyboard vs regular keyboard — what the research says, the myths, and what features matter.
- Standing desk converter vs full standing desk — a decision tree for adding sit/stand to your setup.
- Under-desk footrest: do you need one? — the honest necessity interrogation for footrests.
- How to choose a laptop stand — a category decision grid for laptop stands and monitor arms.